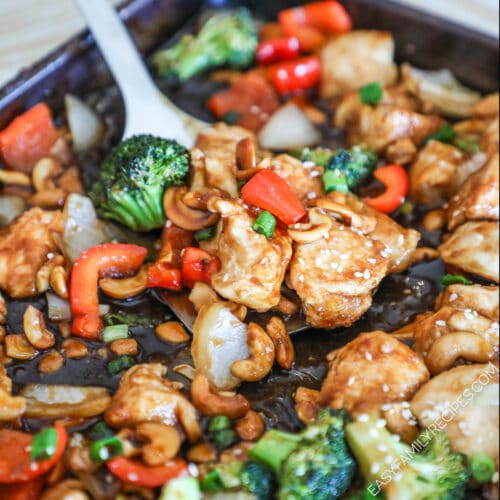
This Sheet Pan Cashew Chicken is the ultimate dinner for busy weeknights! Tender chicken, crisp veggies, and crunchy cashews all cook together on one pan and get coated in a sweet, savory, slightly spicy sauce that’s totally irresistible. It’s quick to prep, big on flavor, and it”ll make busy nights taste way more exciting.

I make this recipe all the time simply because it checks every box for everyday dinners. It’s easy to make, packed with lots of flavor, and it always feels a little extra because of the toasted cashews and sticky homemade sauce! It feels like Chinese takeout, only better!
Plus, I’m a huge fan of sheet pan meals. I love that I can toss everything on one pan and walk away, no stirring and no cleanup stress! This easy sheet pan cashew chicken recipe is simple to prep and it makes the perfect weeknight dinner! It doesn’t get better than that.
Why I LOVE this recipe!
- It’s a one-pan dinner – Everything cooks together for easy prep and even easier cleanup.
- Huge takeout-style flavor – The sauce is sweet, savory, garlicky, and just a little spicy. It gives restaurant vibes, without the restaurant price!
- Customizable – Swap the veggies, adjust the heat level, or make it gluten-free. It’s super flexible.
- Family-friendly – The flavors are bold but not overpowering, and everyone can adjust their bowl with toppings.
Recipe Notes
This Sheet Pan Cashew Chicken recipe is as simple as promised! Just toss, bake, and sauce for a family-friendly dinner that delivers big flavor with minimal effort.
In this section I am going to go through a few tips and tricks I use for how to make chicken with cashew nuts to get the absolute best and most delicious results.
Make sure to scroll to the bottom for the FULL recipe card.
Ingredients + Substitutions
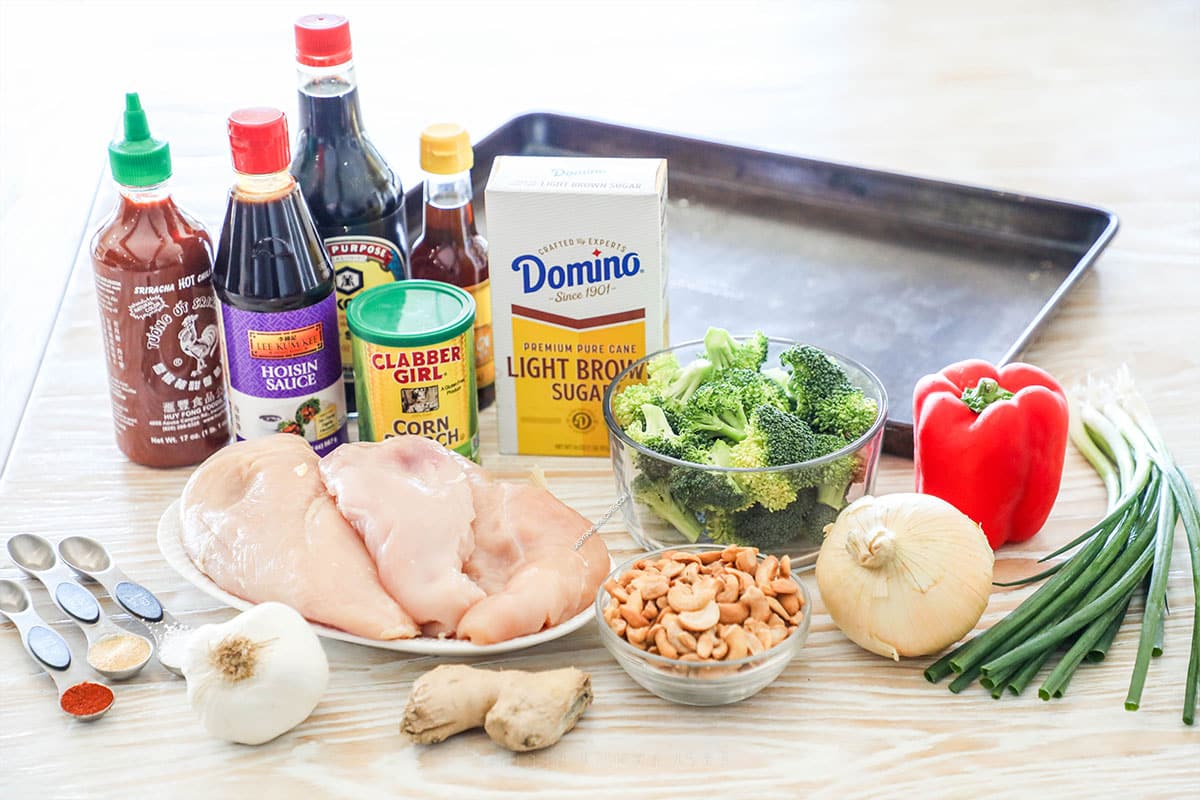
- Chicken breast or thighs – Cut into 1-inch pieces! I always use boneless skinless chicken breasts, but chicken thighs works great, too.
- Sesame oil – For flavor and browning! Substitute avocado or olive oil if needed.
- Cornstarch – Helps the chicken crisp and gives the sauce something to cling to.
- Seasonings – Salt, garlic powder, paprika. Simple but effective.
- Broccoli florets – Use pre-cut florets to save time.
- Red bell pepper – Adds sweetness and color. Any color of bell pepper works, but green bell pepper is not as sweet.
- Onion – Yellow or white both work.
- Cashews – Raw cashews or roasted cashews both work. Roasted gets extra toasty in the oven.
- Hoisin sauce – The base of the sauce! Gluten-free versions are available, if needed.
- Soy sauce – Use tamari for a gluten-free option.
- Sriracha – Adjust to taste or skip for mild.
- Brown sugar – Balances the salty/spicy elements.
- Garlic + ginger – Fresh for the best flavor!
Make sure to see the recipe card at the bottom of this post for the full quantities and ingredients list.
Recipe Variations
If you love this recipe as much as we do and want some quick ways to change it up for variety, these little tips will do the trick!
- Extra Veggie Version – Add in extra vegetables like mushrooms, snap peas, carrots, or zucchini.
- Spicy Cashew Chicken – Increase the sriracha or add red pepper flakes before baking.
- Gluten-free Cashew Chicken – Use gluten-free hoisin and tamari instead of soy sauce.
Recipe Step by Step
I am going to highlight a few key steps in the recipe here, but make sure to jump down to the recipe card for comprehensive instructions on how to make chicken and cashew nuts.
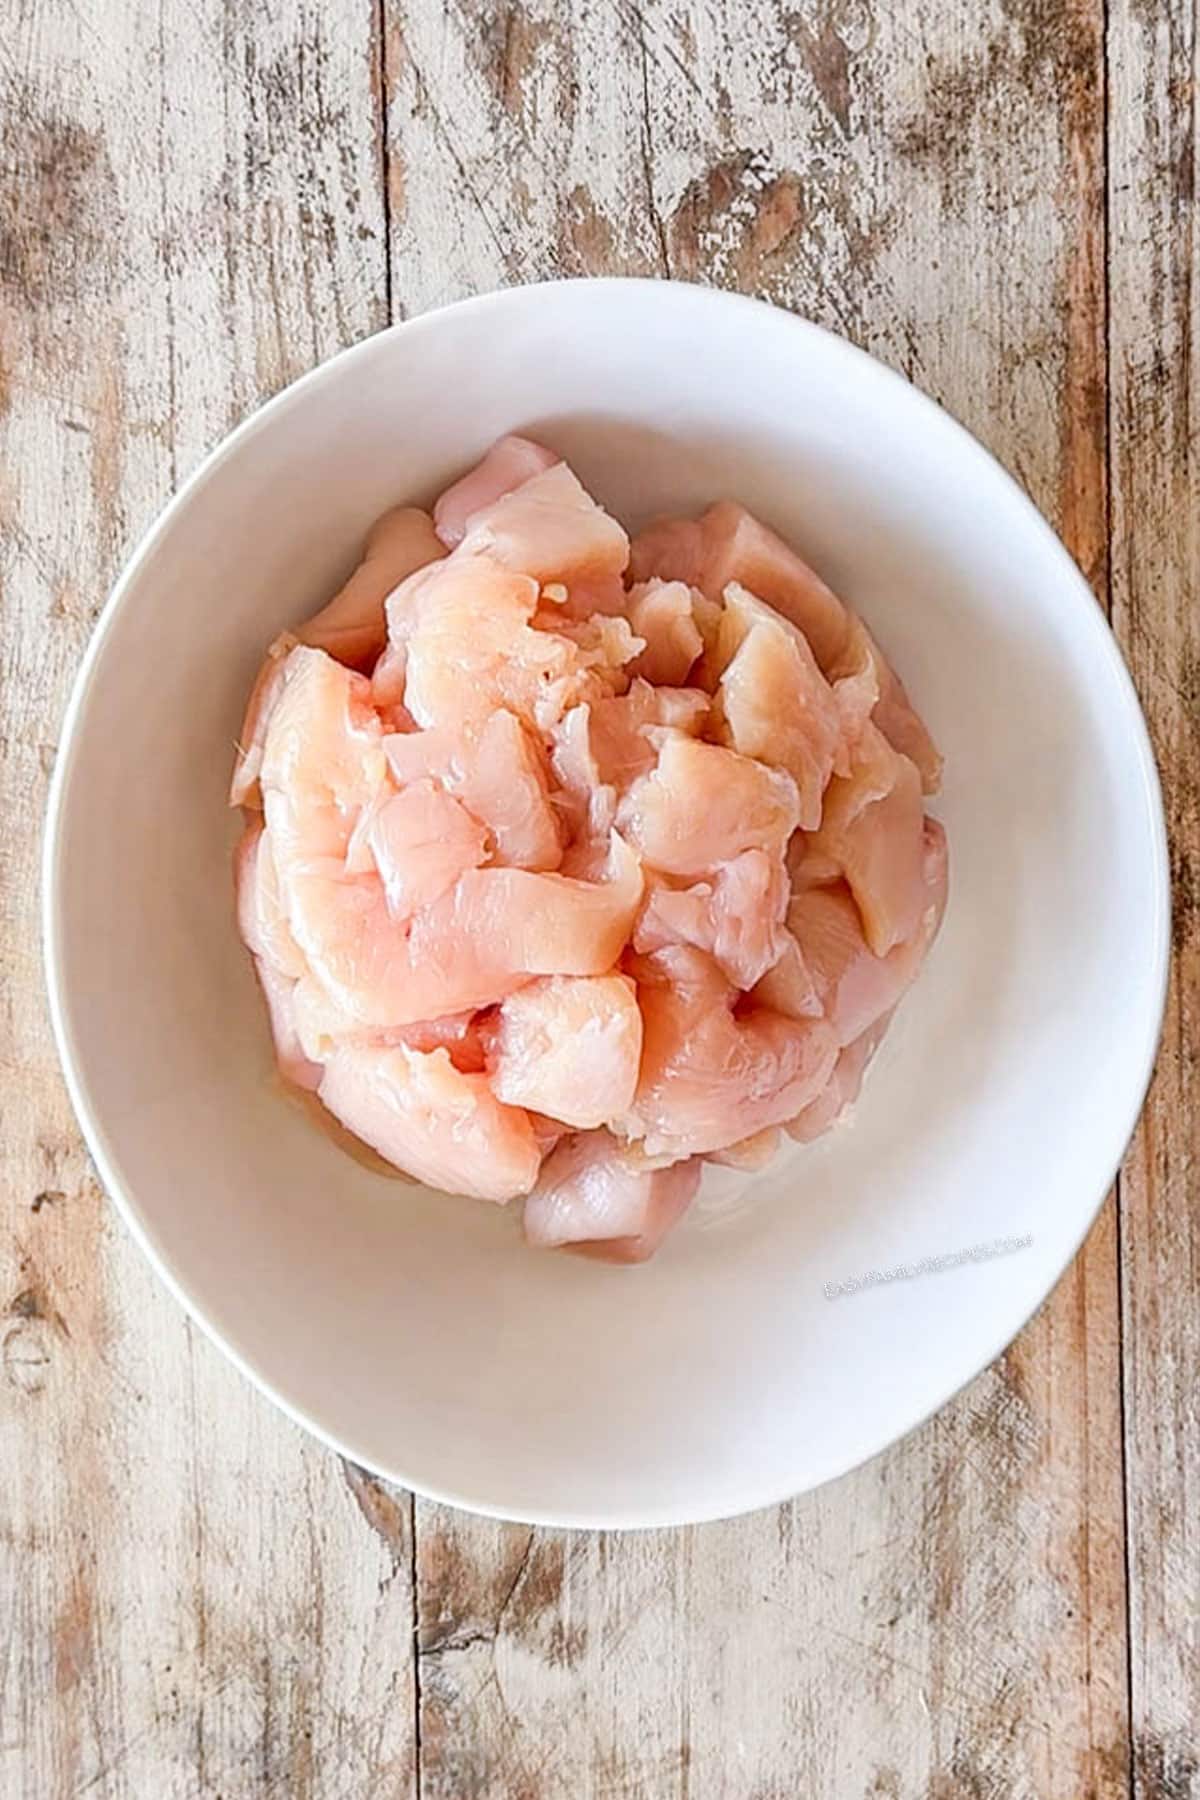
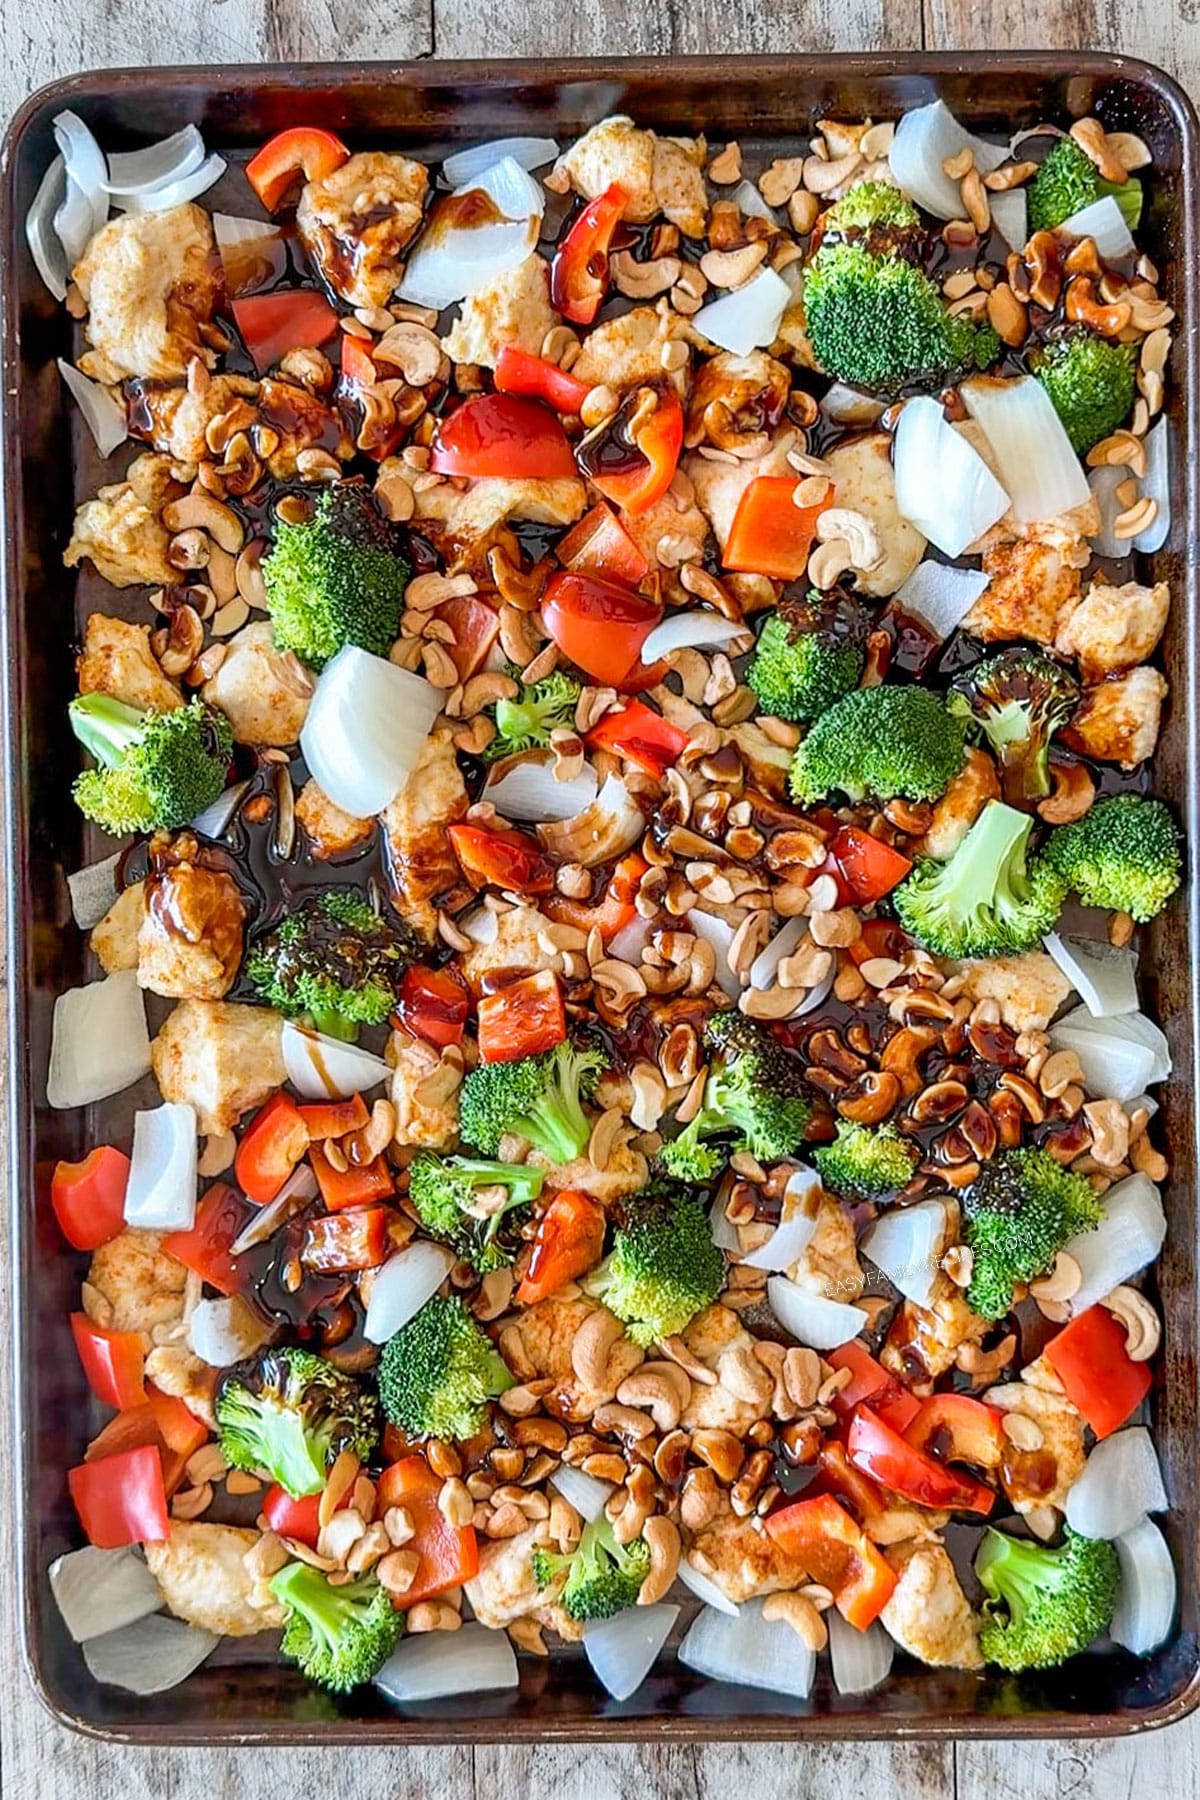
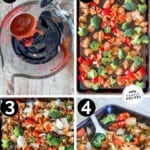
Preheat oven to 400˚F. Cut the chicken into 1 inch bite-sized pieces.
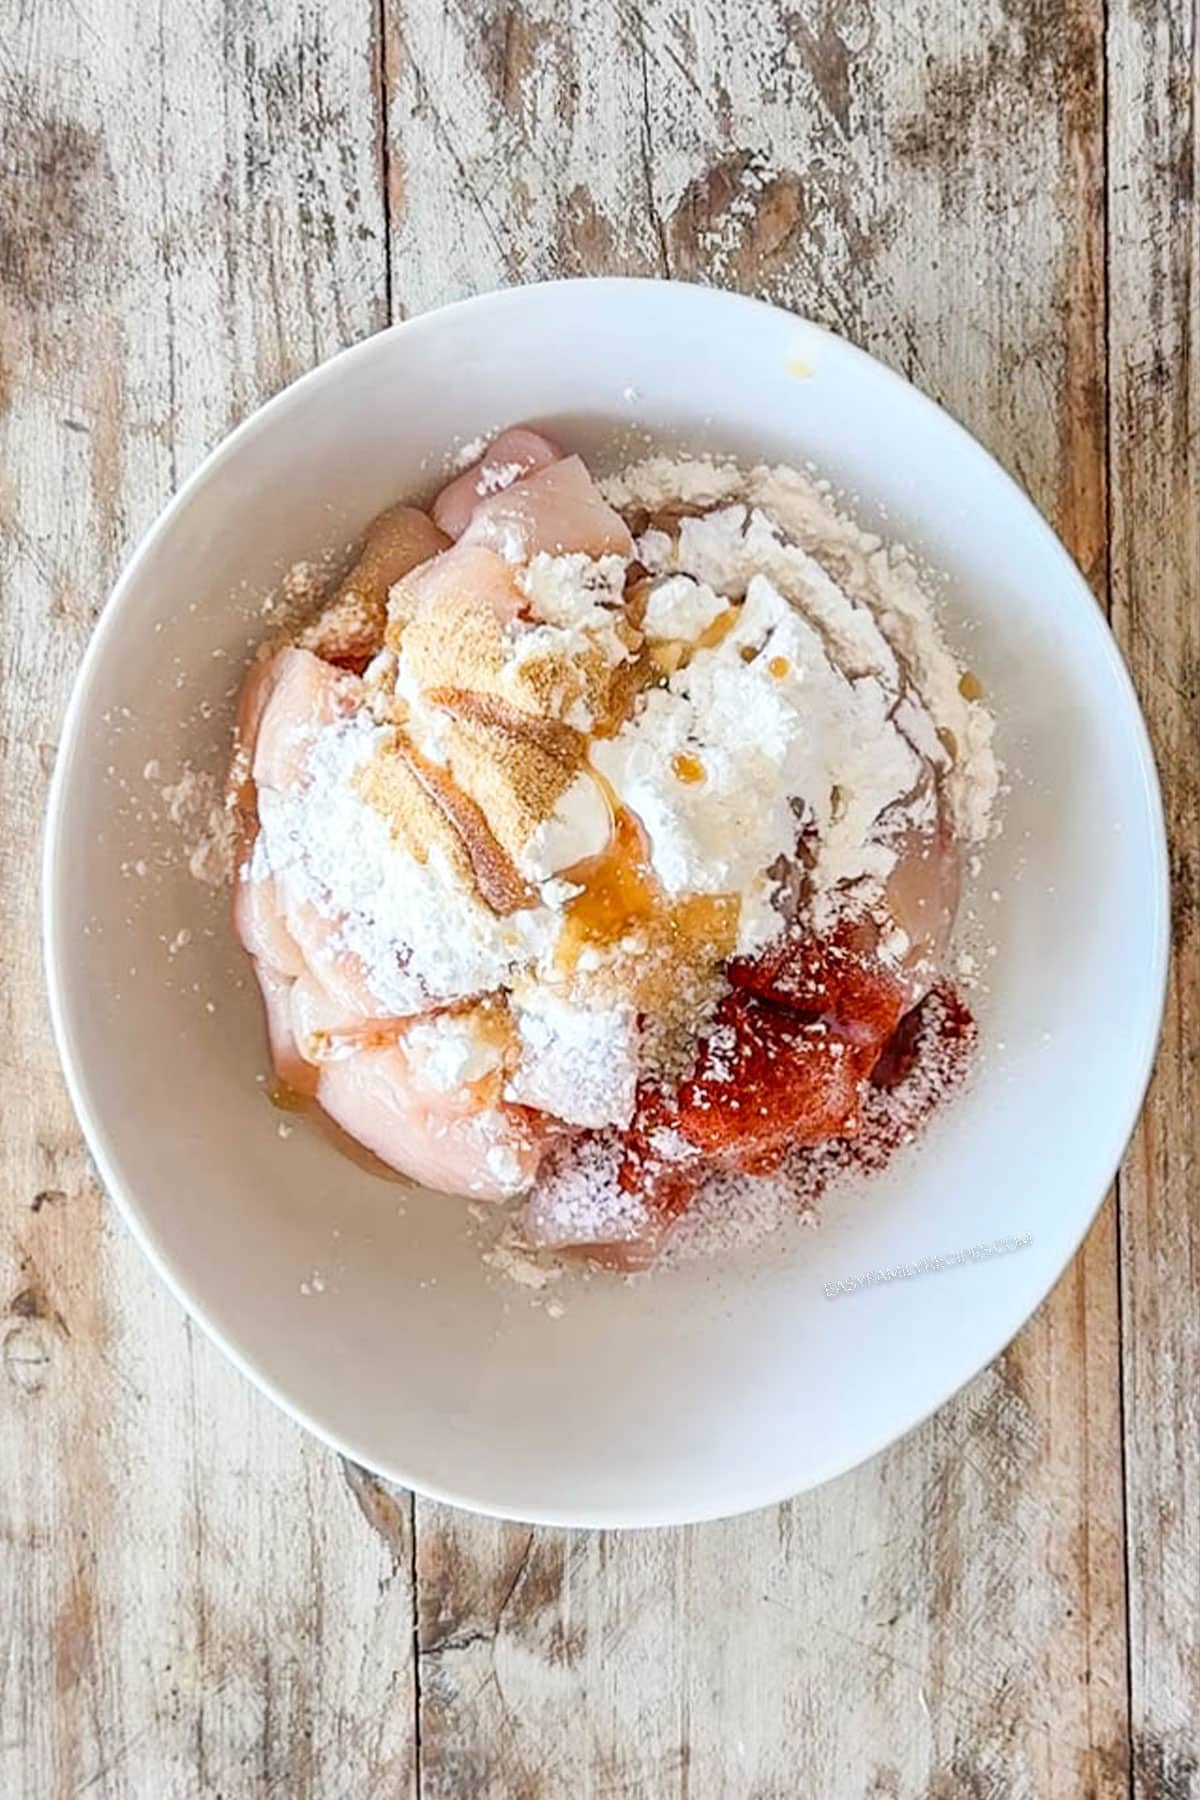
Add the sesame oil, cornstarch, salt, garlic powder, and paprika. Work the chicken until it is evenly coated with the mixture.
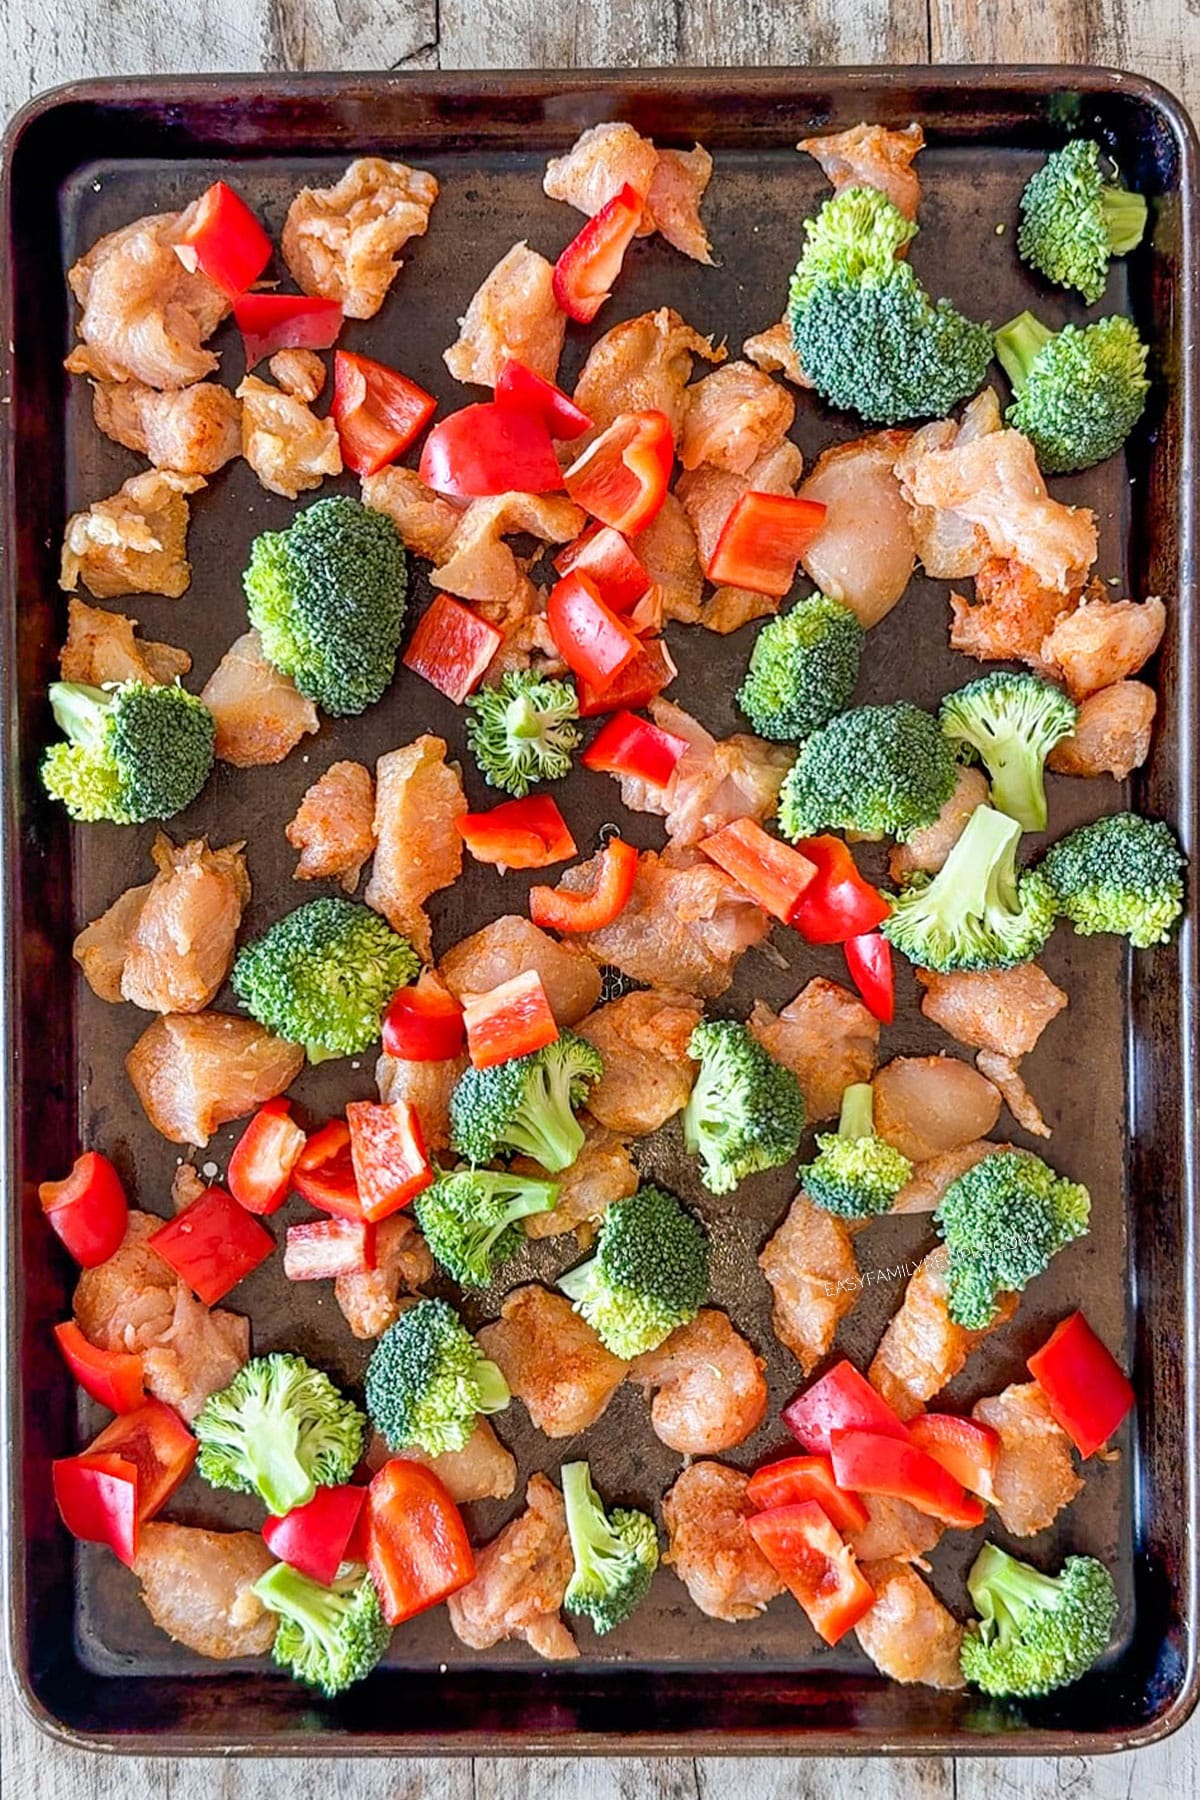
Spread chicken in a single layer on a large greased sheet pan. Add the broccoli, red pepper, and onion. Then sprinkle cashews over the top. Bake for 10 minutes.
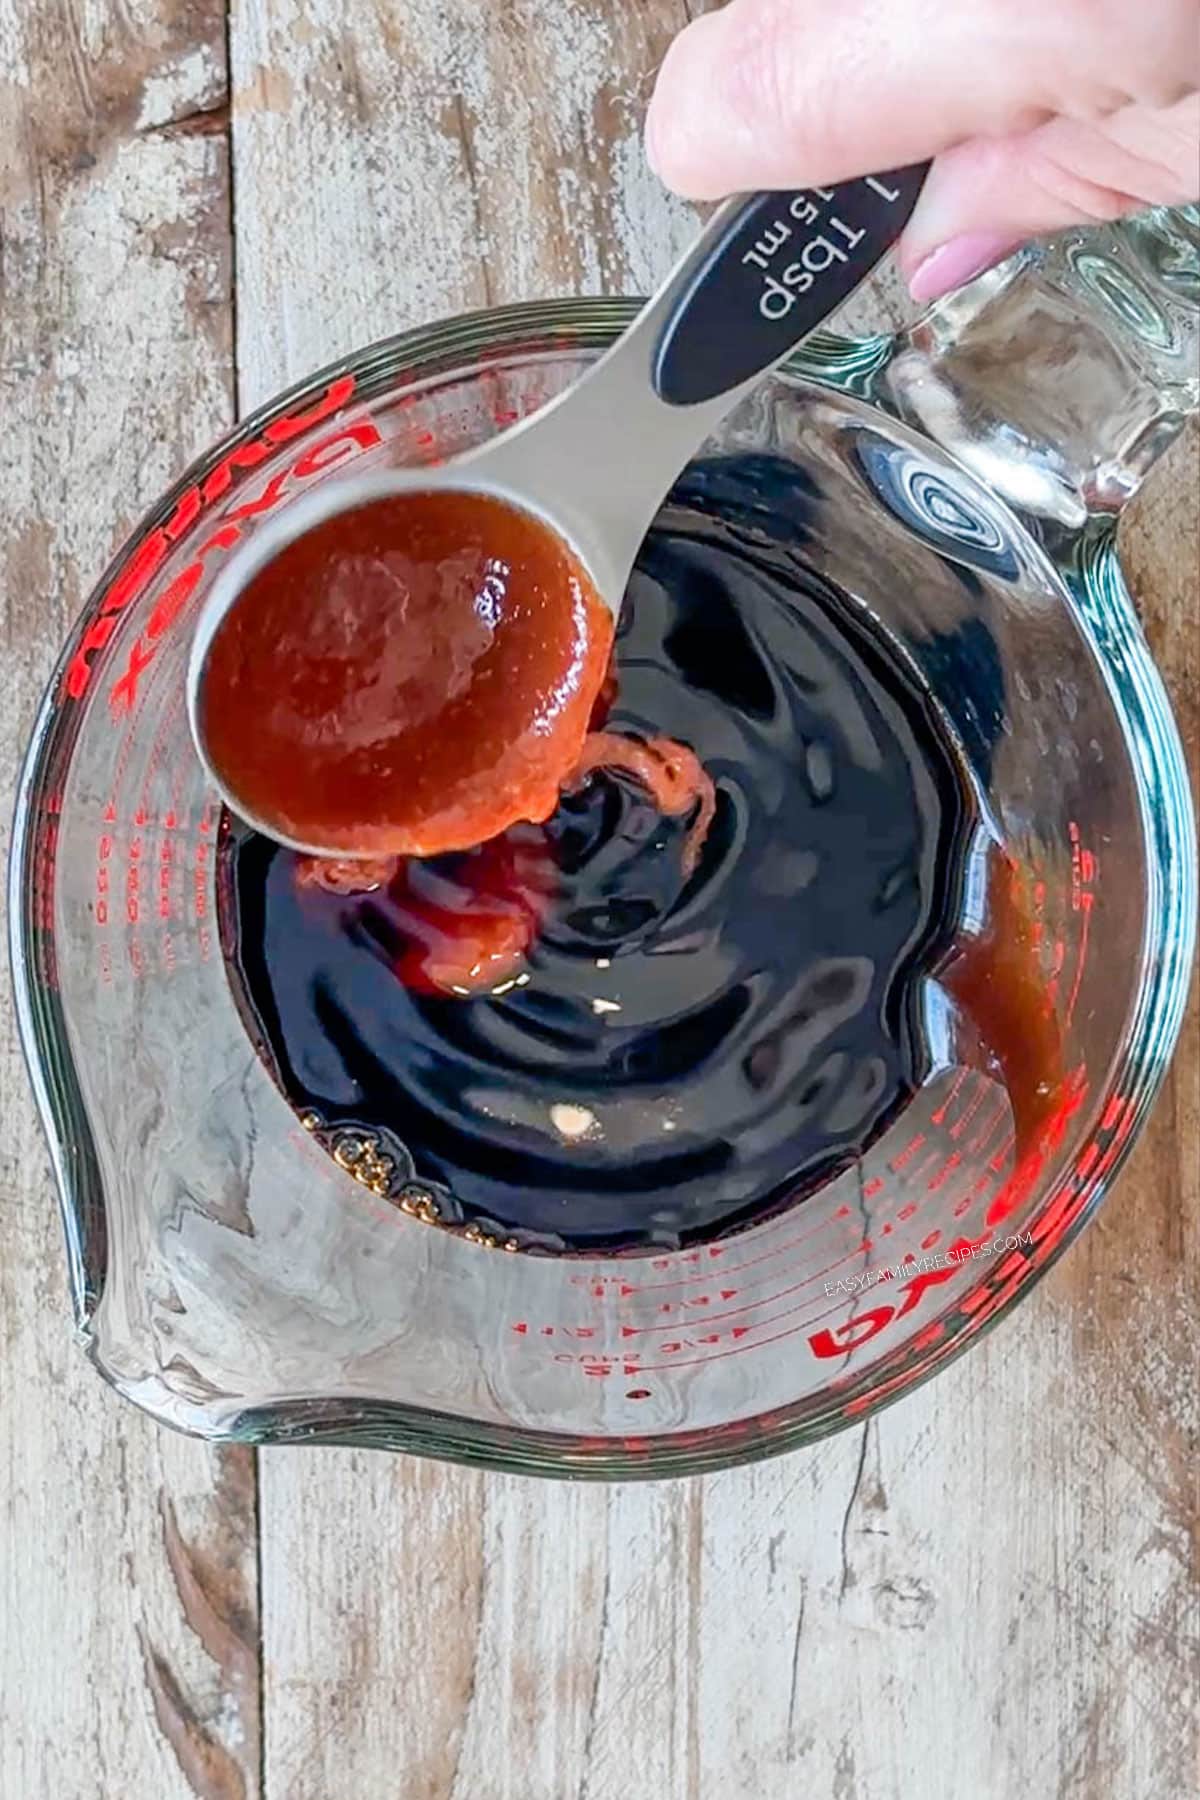
Make the sauce by whisking together hoisin sauce, soy sauce, sriracha, brown sugar, garlic, and ginger.
Remove the sheet pan from the oven. Pour the sauce over the chicken and vegetables. Toss the chicken and veggies with the sauce.
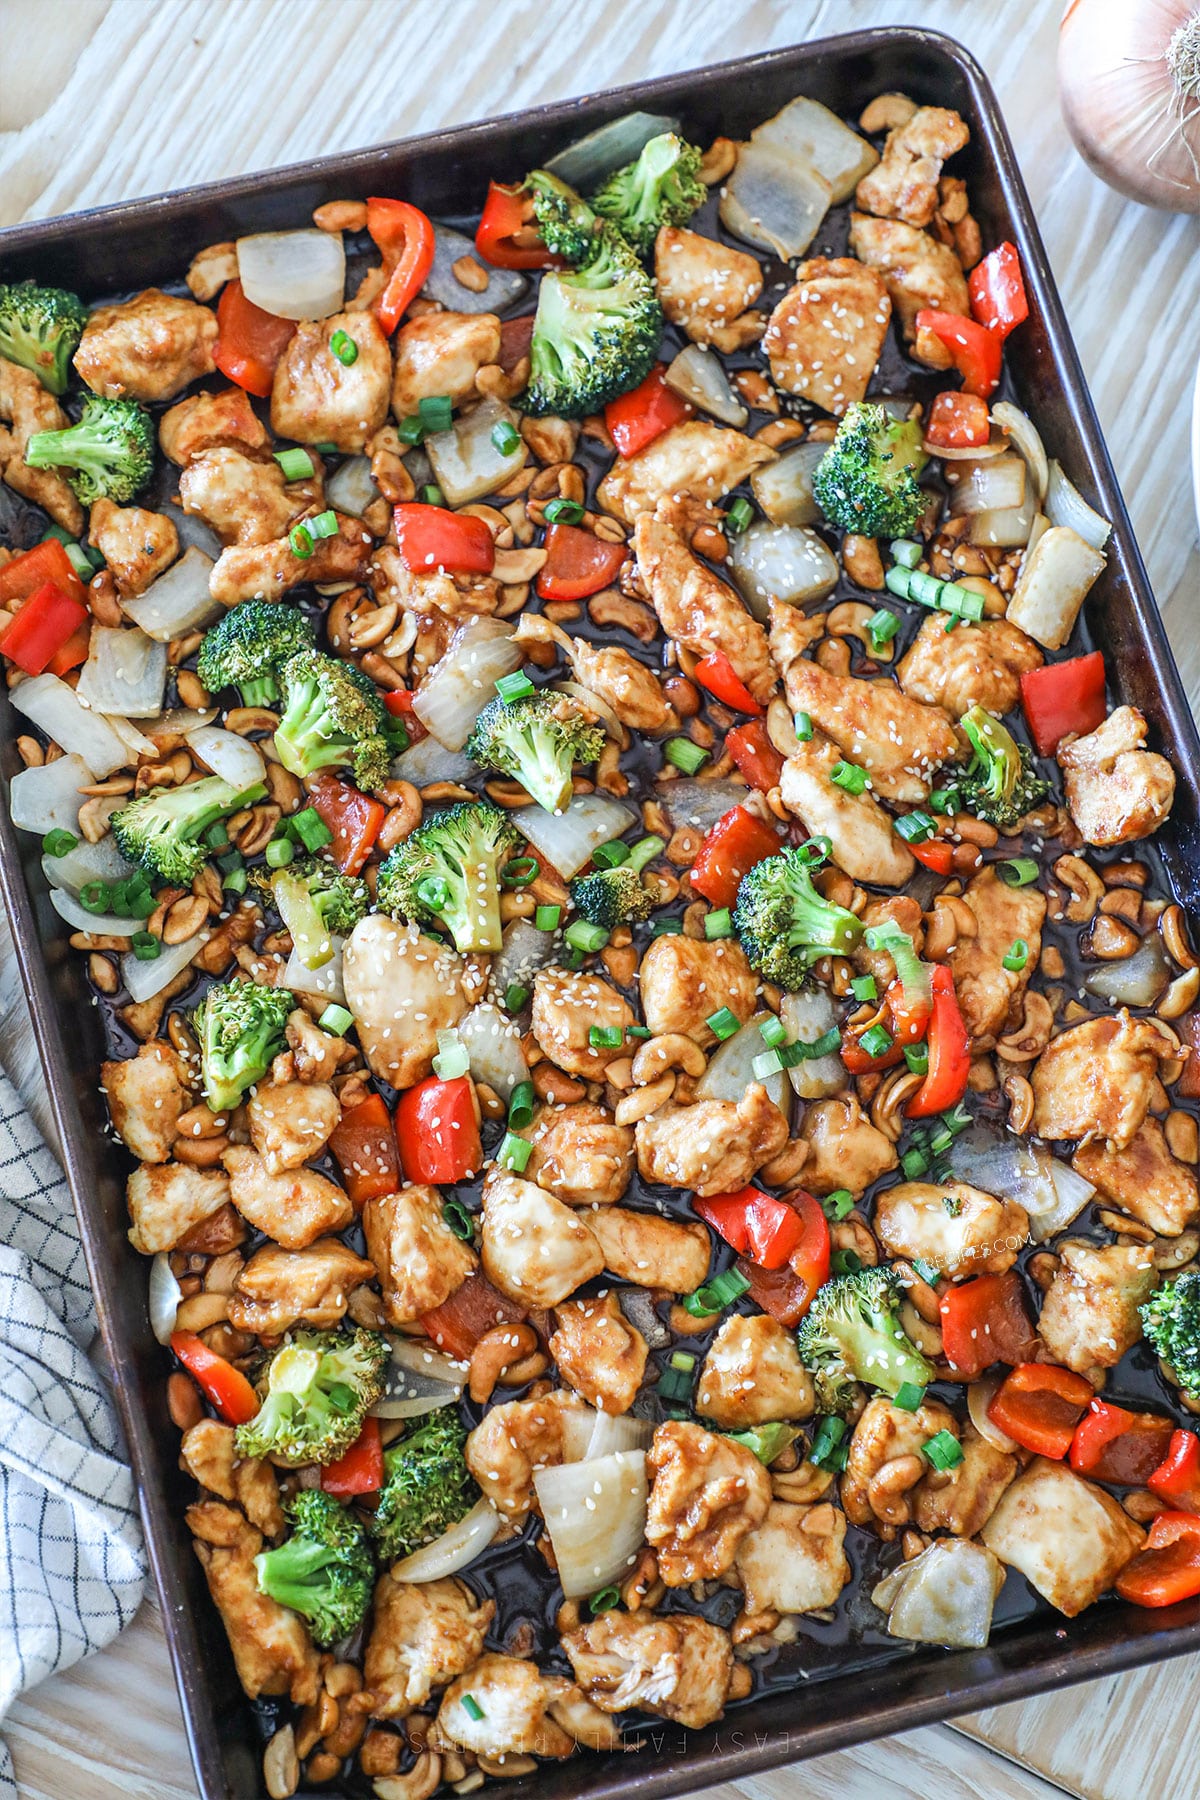
Return the sheet pan to the oven for 4-6 more minutes, or until chicken is cooked through (165˚F internal temp.)
Recipe Tips
- Cut the chicken evenly – Even-sized pieces cook at the same rate, which helps prevent dry or overcooked bits.
- Don’t overcrowd the pan – If everything is piled on top of each other, the chicken and veggies will steam instead of roast. Spacing them out helps them brown, caramelize, and stay crisp-tender.
- Toasted cashews = flavor – Adding the cashews before baking allows them to get warm and toasty in the oven. This deepens their nuttiness and adds the best crunchy texture!
Recipe Short Cuts
If you need to make this recipe, but are extra short on time, here are a few ideas that can help make this recipe even faster!
- Use pre-cut veggies – Bagged broccoli florets and sliced peppers cut prep time in half!
- Buy pre-minced garlic and ginger – Still delicious, zero chopping.
- Prep the chicken in advance. If you know you’re going to be crunched for time when it is is time to make dinner, you can season it the morning of and store in the fridge!
- Make the sauce ahead – Whisk and refrigerate up to 3 days in advance.
Freezer Meal Instructions
Making this sheet pan cashew chicken recipe into a freezer meal is simple! Follow the steps below and you can store this recipe in the freezer for up to 6 months.
To freeze before cooking
- Add the chicken, sesame oil, cornstarch, and seasonings to a freezer bag and seal.
- Add the veggies and cashews to a second freezer bag.
- Freeze the sauce separately in a small container or bag.
How to Freeze Cashew Chicken After Cooking
- Let the cooked cashew chicken cool completely.
- Divide into freezer-safe containers.
- Freeze up to 6 months and reheat in the microwave or stovetop.
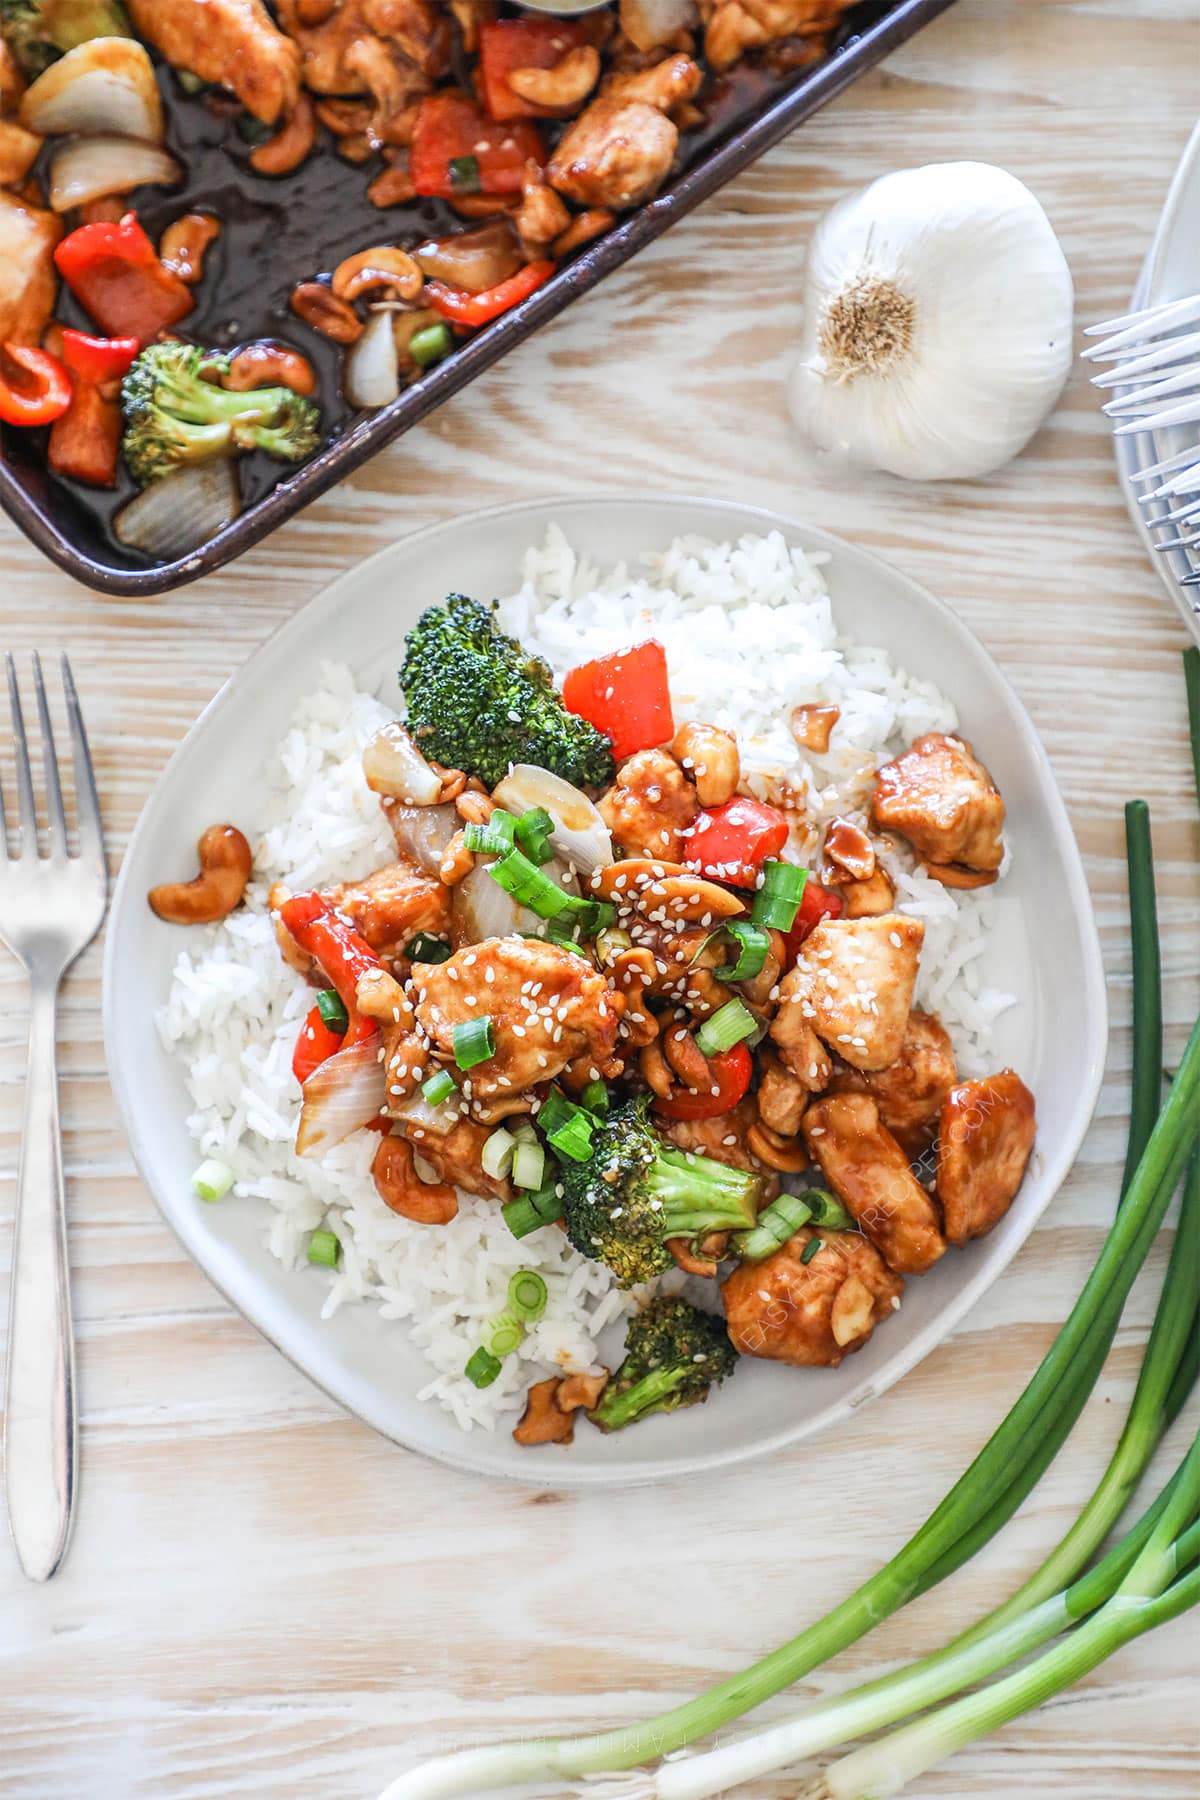
What to Serve with Sheet Pan Cashew Chicken
Since this protein based dinner has the delicious flavors of sweet & savory cashew chicken, it will pair well with many of your favorite Asian-inspired side dishes.
Choose one or several of these side dishes to create a wholesome, well-rounded dinner. There are both classic options and some healthy options to keep it light.
Side Dish Ideas
Sheet Pan Cashew Chicken Leftovers
If you have leftovers after making this recipe, then it is your lucky day! They save and reheat well, and can make the start of another delicious dish.
To save leftovers, separate into meal sized portions and then place in an airtight container and store:
- in the refrigerator for 3-4 days
- in the freezer up to a month
Leftover Recipes
Here are a few ways to repurpose that leftover cashew chicken and give it a delicious makeover!
- Cashew Chicken Fried Rice – Chop up leftovers and toss into fried rice with eggs and peas.
- Cashew Chicken Lettuce Wraps – Spoon warmed leftovers into crunchy lettuce cups.
- Cashew Chicken Noodle Bowls – Mix with cooked rice noodles and a splash of soy sauce.
Recipe FAQ’s
Does this work with frozen chicken?
It’s best to use fully thawed chicken so the pieces cook evenly and brown properly. Frozen chicken releases extra liquid, which can make the veggies soft instead of roasted.
Can I make this recipe nut-free?
Absolutely, just skip the cashews or replace them with something crunchy like roasted chickpeas. It won’t have that nutty flavor, but you’ll still get a delicious sheet pan dinner!
How can I meal prep this healthy cashew chicken recipe?
You can meal prep this recipe by cooking it fully, then portioning it into airtight containers with rice or veggies. It reheats really well and stays flavorful for several days.
More EASY Chicken Recipes
If you enjoyed this recipe, I really hope you will take a moment to grab a few more easy recipes for another busy night!
You can check out all of my easy chicken recipes here, or see a few of our readers favorite recipes below.
- Bang Bang Chicken & Rice Bake
- Chicken Vegetable Stir Fry with Zucchini
- Slow Cooker Orange Chicken
- Teriyaki Chicken Casserole
Sheet Pan Cashew Chicken
Ingredients
For the chicken
- 1.5 pounds boneless skinless chicken breast or thighs
- 1 tablespoon sesame oil
- 2 tablespoons corn starch
- 1 teaspoon salt
- 1 teaspoon garlic powder
- 1/2 teaspoon paprika
For the sheet pan
- 4 ounces small broccoli florets
- 1 red bell pepper, roughly chopped
- 1/2 sweet yellow onion, roughly chopped
- 1 cup cashews
For the Sauce
- 1/2 cup hoisin sauce
- 1/4 cup soy sauce
- 1 tablespoon sriracha
- 2 tablespoons brown sugar
- 1 garlic clove, minced
- 1 teaspoon ginger, minced
Garnish (optional)
- Green onion
- Sesame seeds
Instructions
- Preheat oven to 400˚F.
- Cut the chicken into 1 inch bite-sized pieces. Add the sesame oil, cornstarch, salt, garlic powder, and paprika. Work the chicken until it is evenly coated with the mixture.
- Spread chicken in a single layer on a large greased sheet pan. Add the broccoli, red pepper, and onion. Then sprinkle cashews over the top.Bake for 10 minutes.
- While the chicken cooks, make the sauce by whisking together hoisin sauce, soy sauce, sriracha, brown sugar, garlic, and ginger.
- Remove the sheet pan from the oven. Pour the sauce over the chicken and vegetables. Use tongs or a spatula to toss the chicken and veggies with the sauce.Return the sheet pan to the oven for 4-6 more minutes, or until chicken is cooked through (165˚F internal temp.)
- Garnish with your choice of sliced green onions and sesame seeds.
Recipe Notes
- Substitutions: Swap chicken breasts for thighs, use any bell pepper color, and replace cashews with peanuts or leave them out if needed. Tamari or coconut aminos also work in place of soy sauce.
- How to Store: Keep leftovers in an airtight container in the fridge for 3–4 days. Store the sauce separately if you prefer everything extra saucy when reheating.
- How to Freeze: Freeze fully cooked leftovers in a freezer-safe container for up to 1 month. Thaw overnight in the fridge before reheating.
- How to Reheat: Warm in the microwave for 1–2 minutes, stirring halfway, or reheat on the stovetop until hot. Add a splash of water to loosen the sauce if needed.
- How to Scale: Double the recipe and use two sheet pans to avoid overcrowding. Halve the recipe easily by using a smaller pan and reducing ingredients accordingly.


Leave a Reply